Category: Blog

  • Home-lab: Part 3

    Good day my tech pilgrims, things have been going steadily this week not a lot of things to report. But I wanted to begin by working on the next steps of our home network build, after this one we are going to focus on building some services and getting our WAP up and running so we can have Wifi available to use on the home network. This article is going to be a little shorter than normal since there’s a lot of material to cover. Let’s begin…

    Picking up where we left off

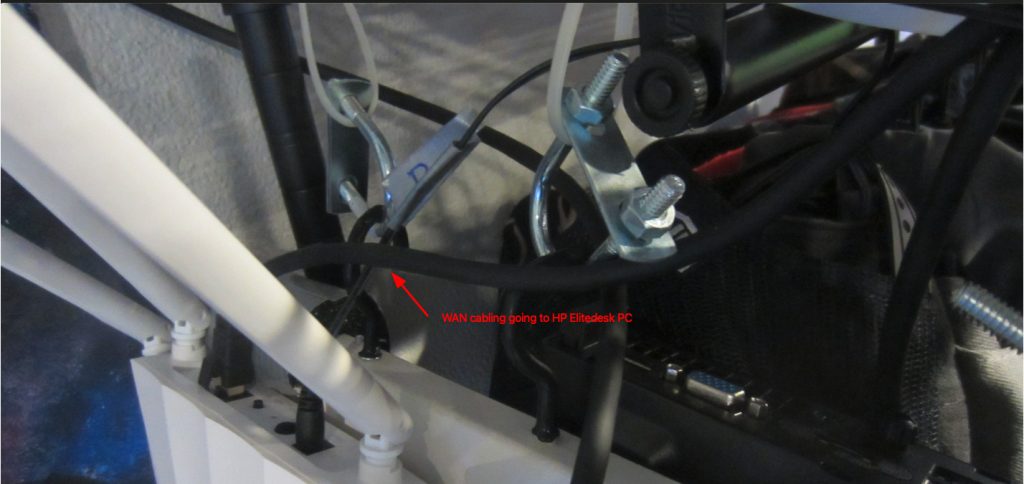
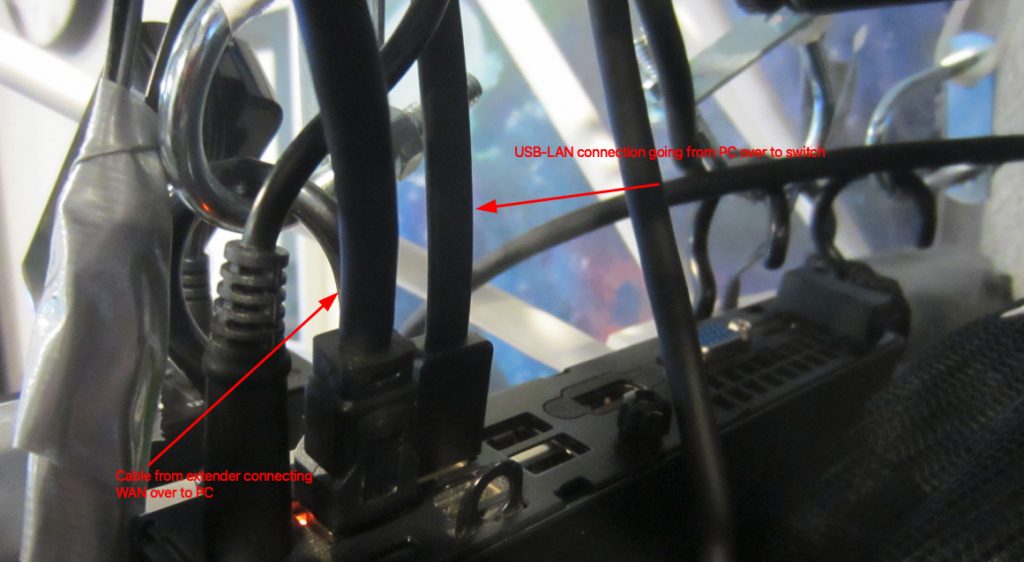
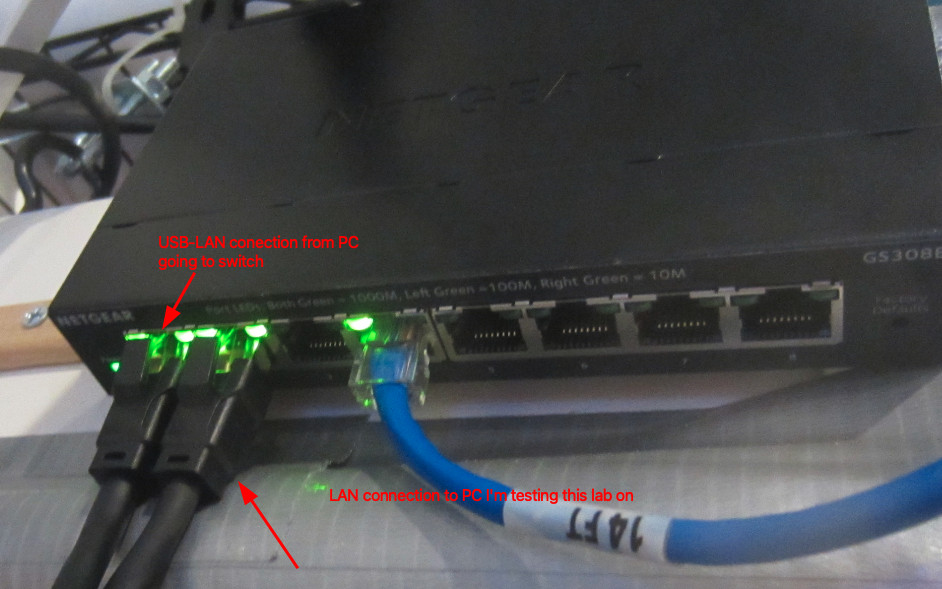
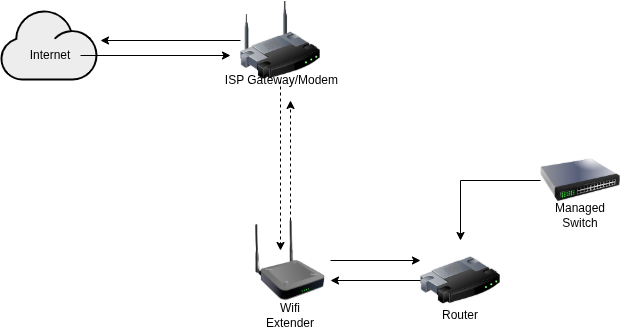
    So to pick up where we left off we’re going to go over one thing that I’ve observed with the current set up. Remember, we haven’t fully completed the installation of OPNSense, it needs to have some more settings configured. But I mentioned that in this set up our ‘gateway’ that we built is simply a Wifi extender. There is a DHCP setting that we can toggle and I was curious to see if it had any effect on performance. To be honest not a whole lot the only thing that I can mention is that with the setting off. The WAN DHCP client gets kicked back up to the gateway router upstairs.

    For my privacy and security reasons I’m not going to mention what my actual home lab IP address ranges are but I can say an example. If my Gateway (not my extender) the one provided from the ISP is at a default IP of 10.0.1.120, then I will make my extender with the same range, but it also has the ability to create it’s own LAN. So for these purposes I would put my default IP address at something like 10.0.1.121, it’s within the range of the established network without hopefully causing any conflicts.

    I define the IP range as something like 10.0.1.124 through 10.0.1.250 on my wifi extender. From there using the same settings we covered last week I set the primary DNS servers as 1.1.1.1 to use Cloudflare’s resolver and 9.9.9.9 to use Quad9’s resolver. So I just wanted to get that out of the way.

    Configuring OPNSense

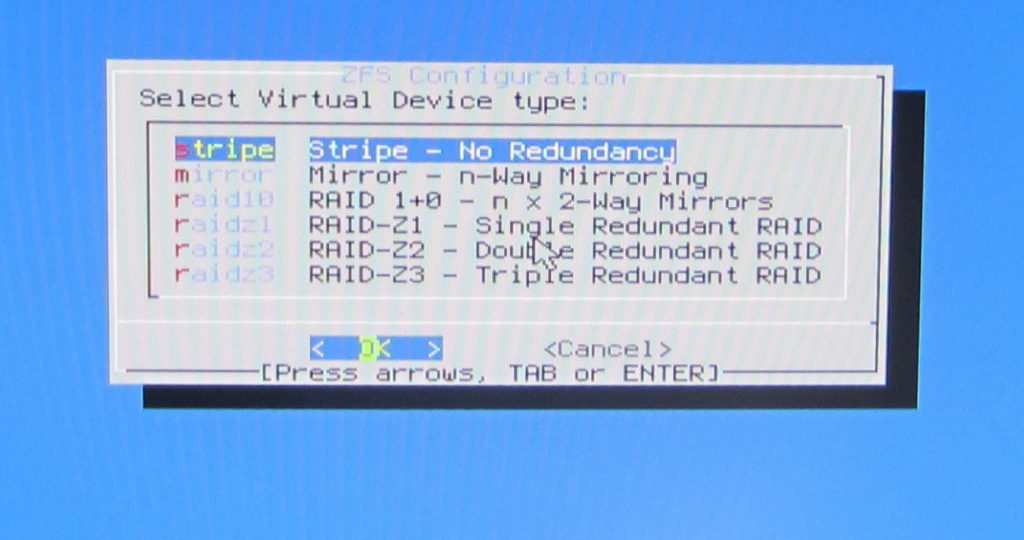
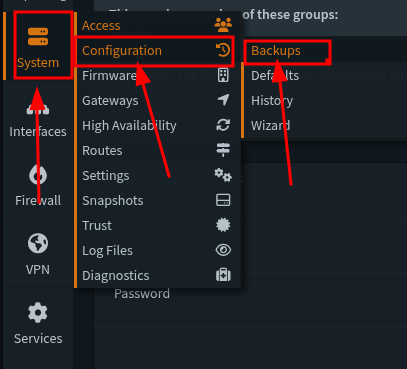
    So in my opinion before starting this part of the build it might be a good idea to first off grab a copy of the current configuration that we’ve done so far. I have learned this the hard way over the iterations that I have done this type of project that there will always be something, like a small change some where that you ‘Save’ and ‘Apply’ and something happens that bricks your system or locks you out of the box that you’re working on. So it’s nice to get into the habit that if we make a change somewhere to back up our configuration before we start building. Head over to this section below and save your current configuration:

    In this fist step I’m going to veer off a little bit from The Network Guy’s walkthrough and instead do our general configuration from the Wizard. So below are the choices that I decided to do:

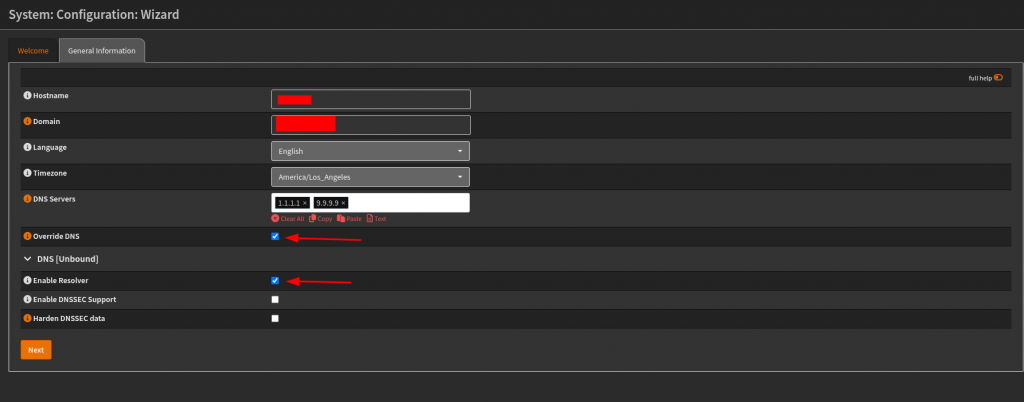
    For the first step I put in my hostname that I want to go by, define time zone and default languages. For the DNS servers I set them to the choices that I made earlier from the previous section. On this step I later changed the setting in Unbound DNS > General settings to allow DNSSEC support. That’s not showing in this picture.

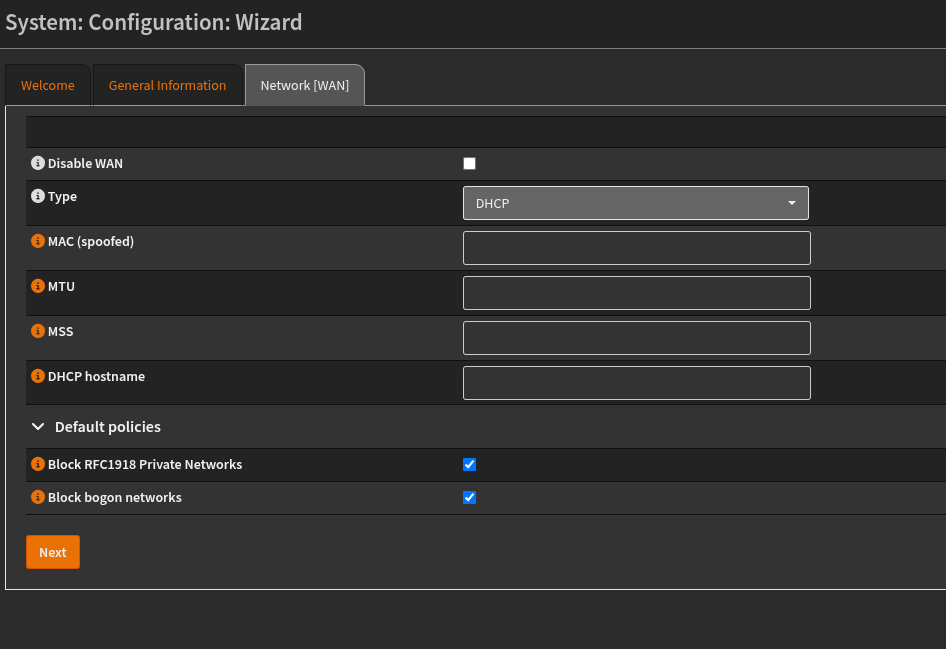
    For this step, I left the selections as is, so not really a lot to mention on this one. For below:

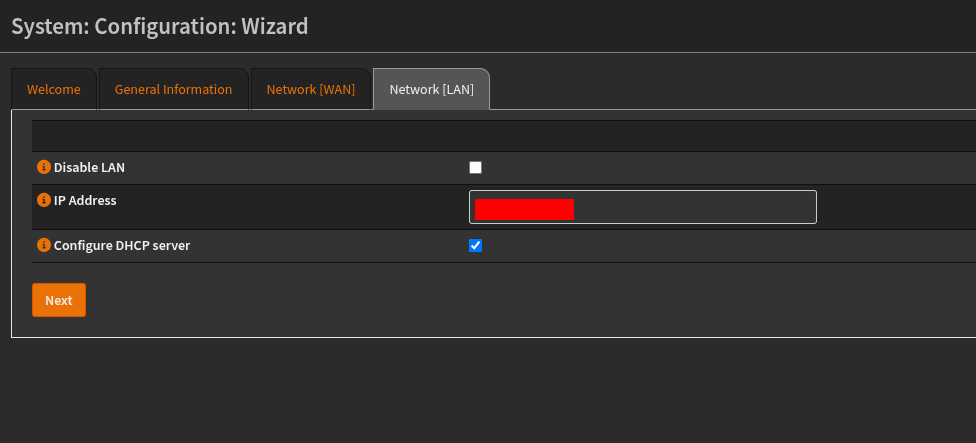
    On this step, we are configuring the settings for the IP address on the LAN, here you can set it as you want, and in this case we’re going to make sure that DHCP is up and running. If you are keeping the default settings, then not really a lot should be changed.

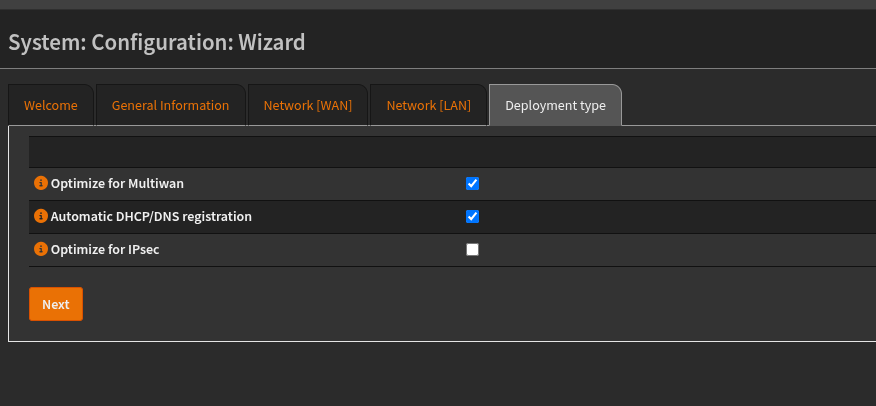
    I think these settings were selected for me so I didn’t change anything here. I need to make sure that DHCP/DNS registration is automated. So when we add clients it will automatically receive IP addresses and add the selection to the DNS agents that are running. I think with this step I’m eventually going to move away from DHCPmasq and over the Kea. Since the OPNsense release 26.1 they stopped support for ISC DHCP so I will need to fine tune the DHCP leases and range to the set that I want. I have the VLAN zones that I want to make but it’ll have to be configured more.

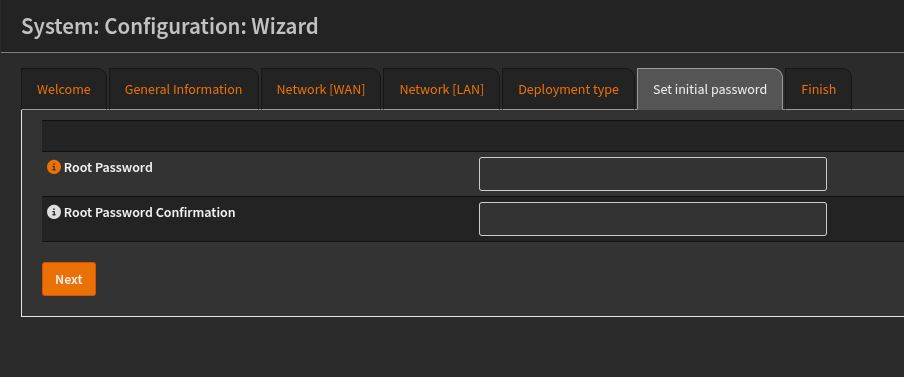
    Last step is to confirm the root password. Which should be pretty simple enough.

    Setting up another user and TOTP:

    So my approach to this network build is to have two users, one is an admin that can implement the router changes through the UI. And the other is a standard
    user who has SSH capabilities to do the same thing.
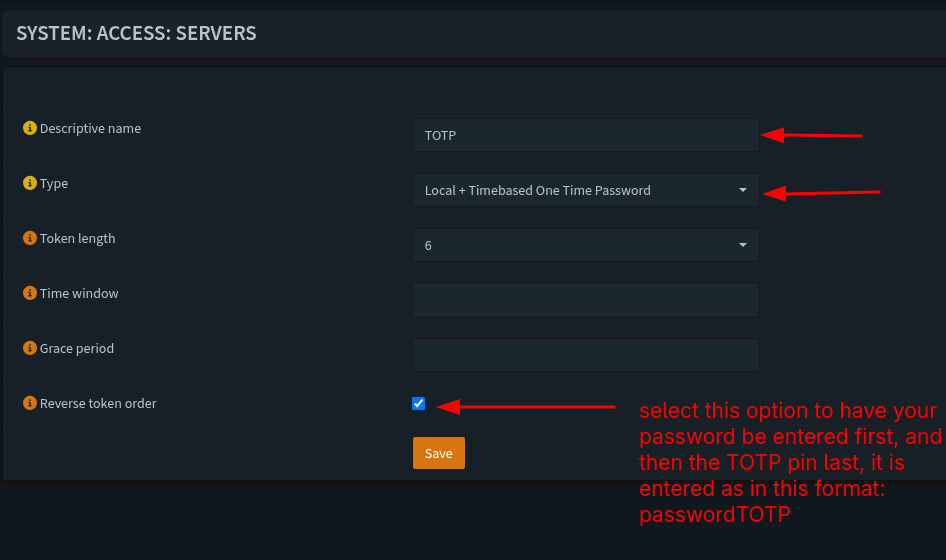
    Before we do a new user we need to setup a server that allows us to do MFA, in this example we’re going to be using a TOTP or a Time Based One Time Password. To do that head over to this section:

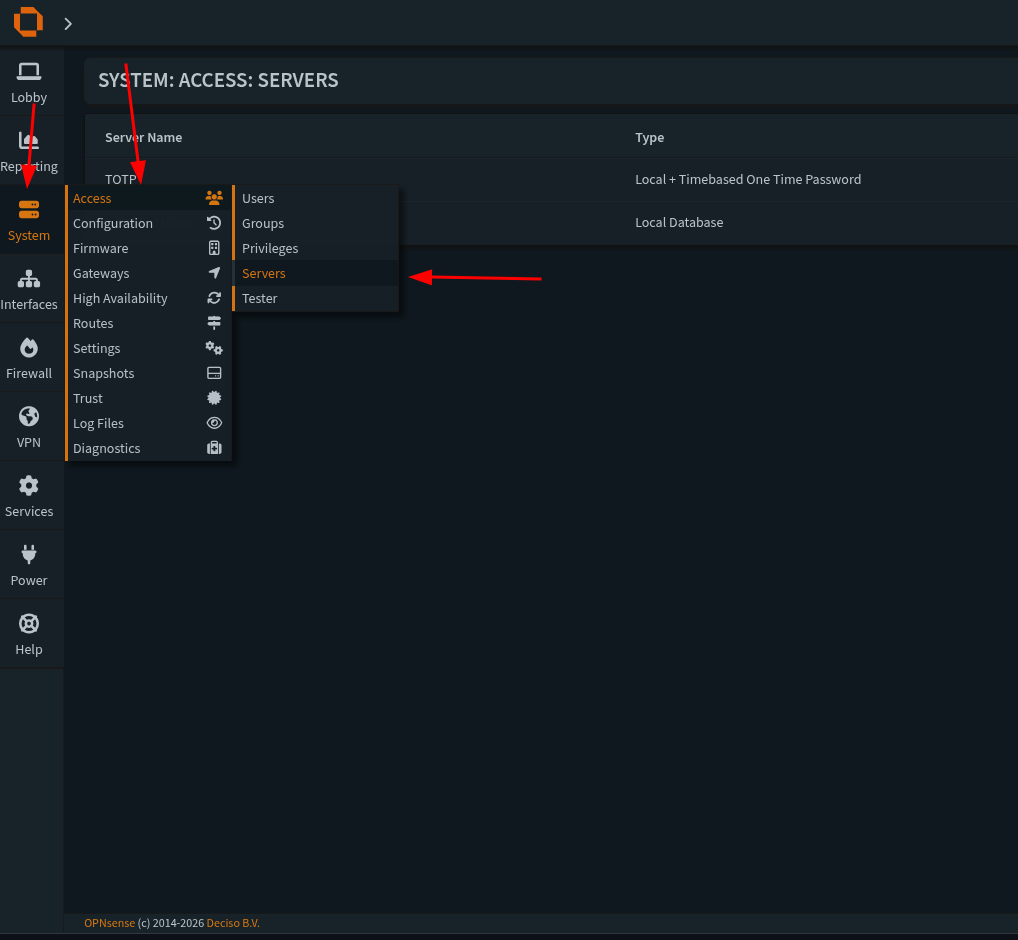
    Then we need to go to this section:

    When we create a new server we’ll need to select a name to call it (we can call it whatever we want). The type needs to be both Local + Timebased Password. Token length should be 6 and I like to have it be reversed because it’ll have us enter our password and login information first and then the TOTP after on the same line as the password. I’ll show an upcoming screenshot with this process. After that we save our settings and we’ll have our server setup correctly. Now we’re ready to create a new user.

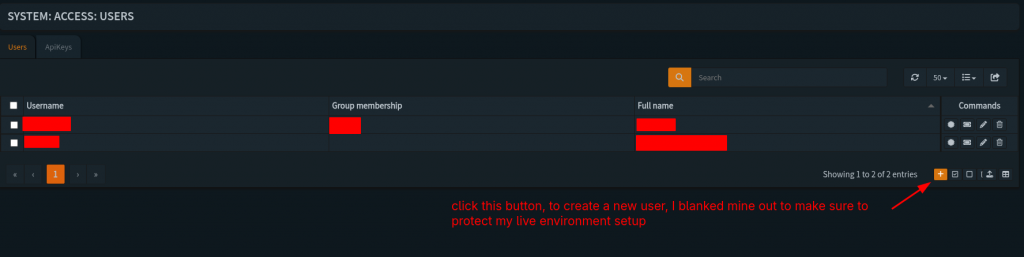
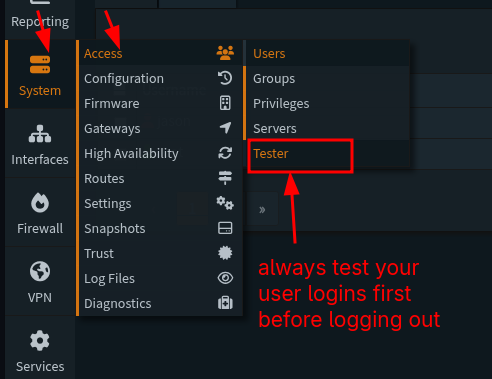
    So we’re going to setup a new user in this case to had admin access through the UI, navigate over to this section:

    But instead of selecting servers we’re going to select users. Under that section when we’re there we need to hit the plus icon at this location:

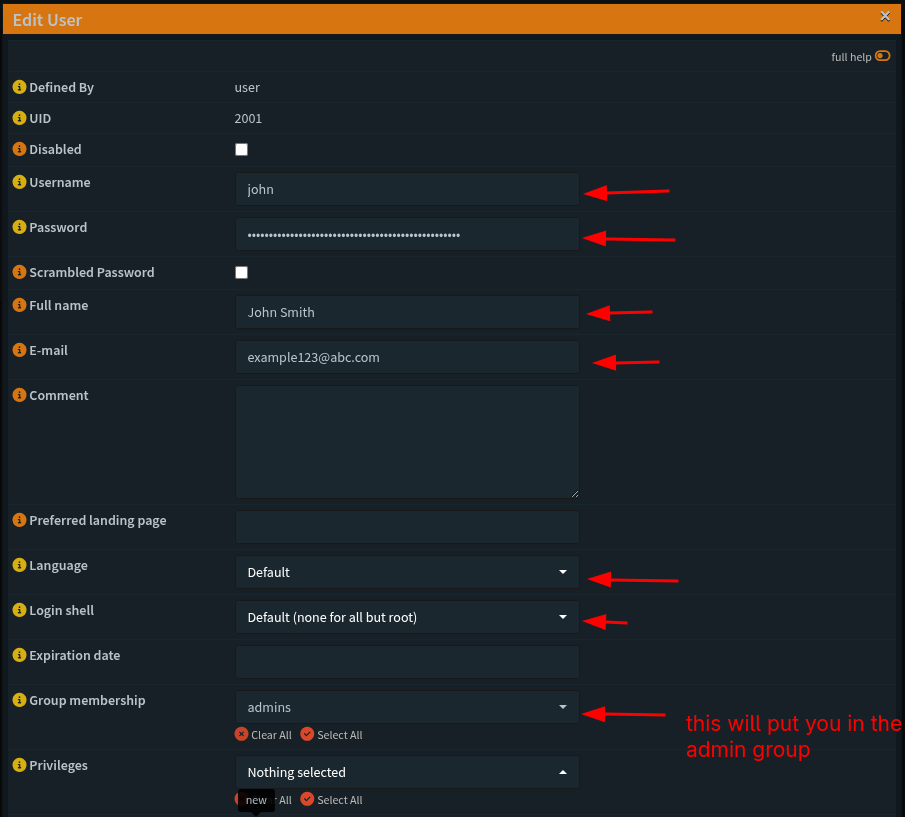
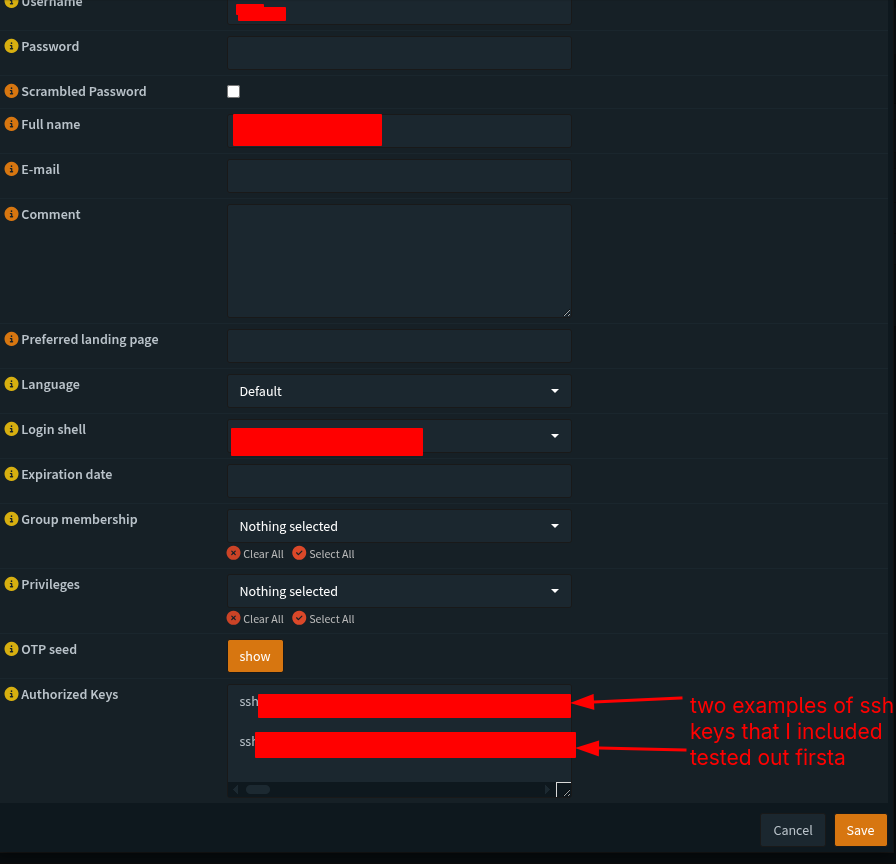
    Fill out the information below from top to bottom

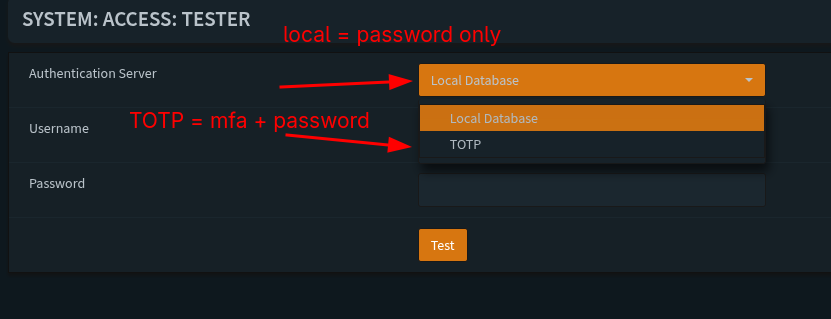
    With these settings locked in we should be good to test our user info for the TOTP and password, head over to this section and enter the following information:

    We should have this message if all of the test login information was successful:

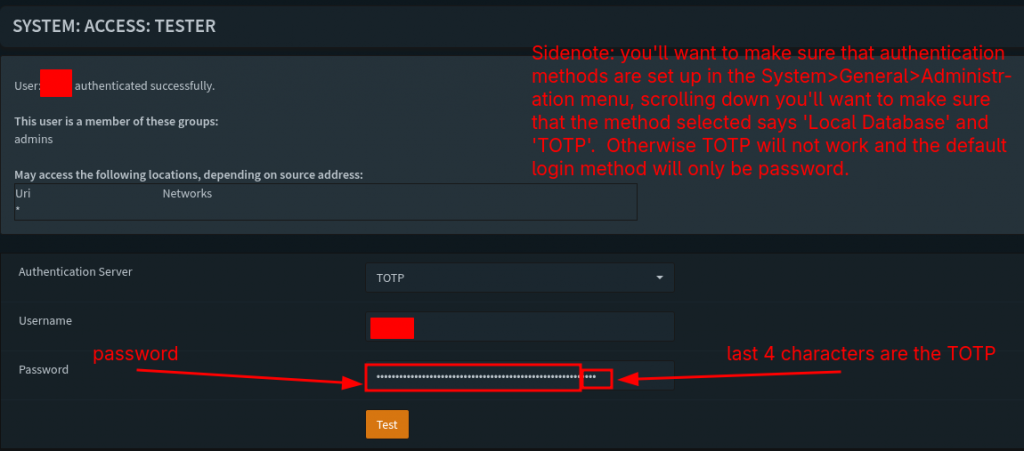
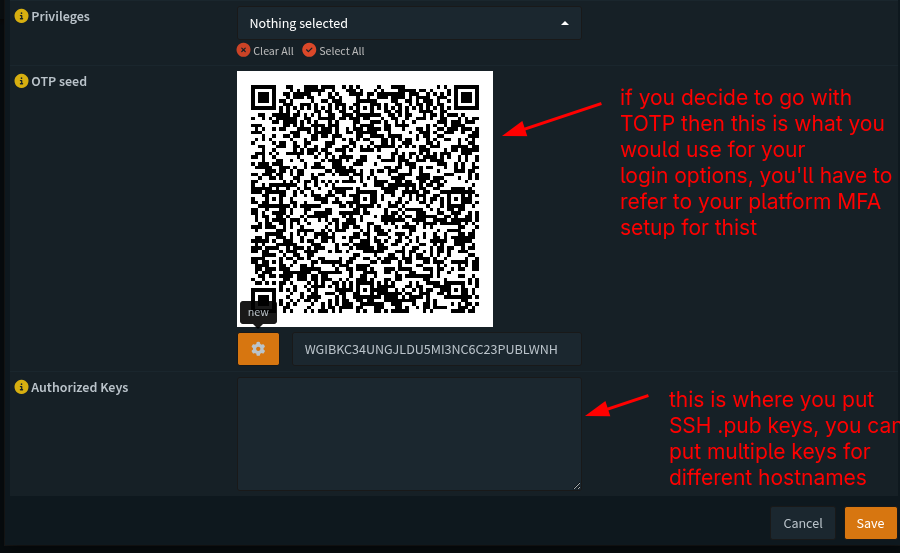
    Side note when we head back to our user info we created we can add SSH public keys to these profiles, and we can add multiple keys for different machiens we want to use.

    We should be good to save the settings and logout to test the login info we set up.

    System Settings:

    So for our next set up we’re going to refer back to The Network Guy’s writeup and navigate over to the following sections:

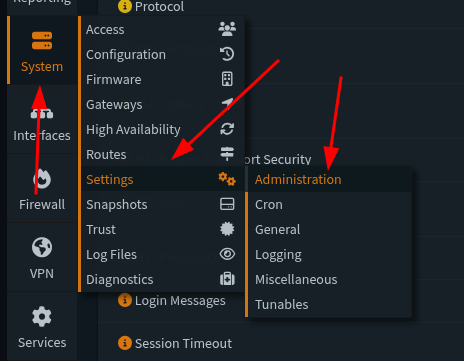
    From there, we are going to select the following sections:

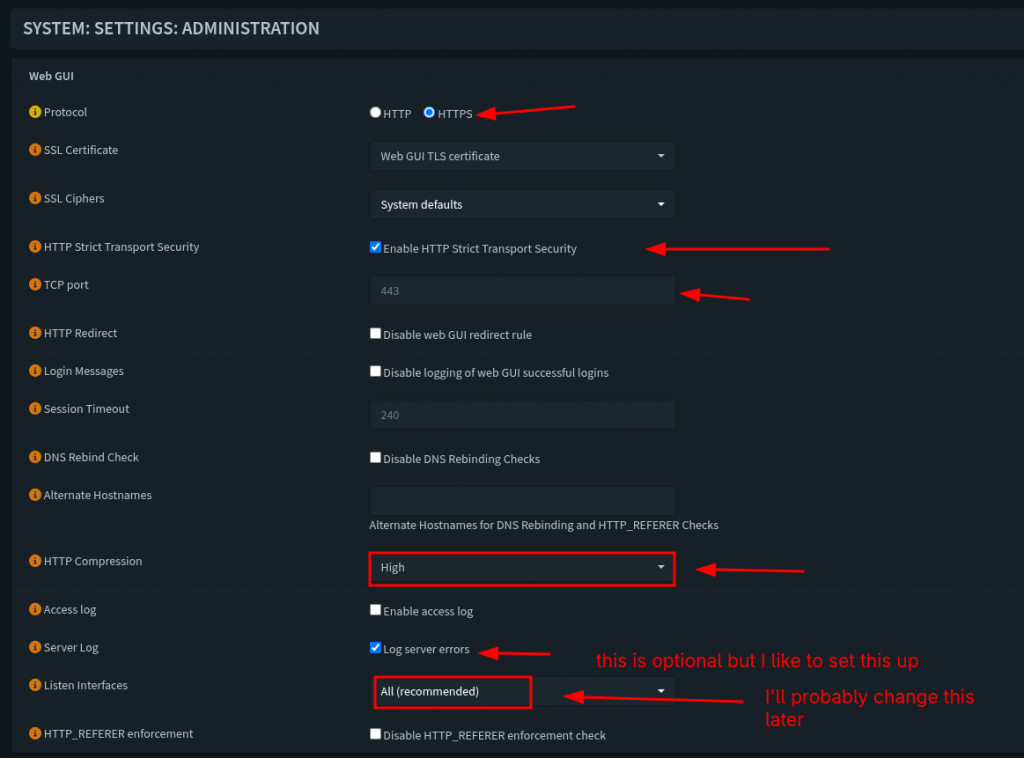
    For this section these are the settings that I personally selected. We want to enforce strict HTTPS protocol for our servers and traffic connection. The next one we’ll do is select the option to enforce transport of this protocol for traffic. TCP port is 443 for now, I don’t think this setting will change as I update this server and box. We’re going to check and enable that the router listens on ‘All Interfaces’, we’re also going to keep the default SSH port to port 22. We will the ‘Listen Interfaces’ feature later as we we setup some VLANs and segment our network for Wifi and a Management layer.

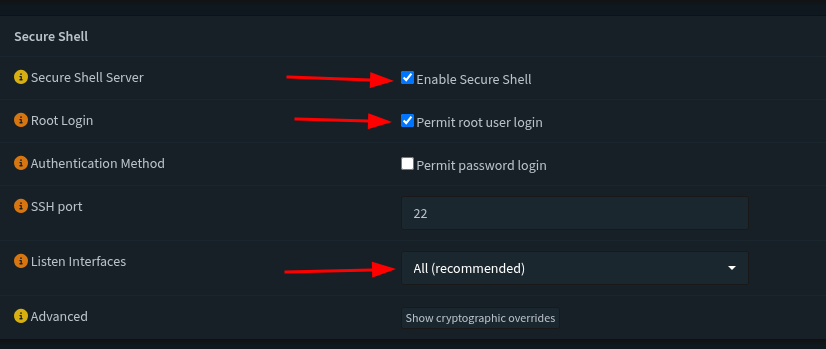
    This section we’re going to enable secure shell, and also permit root login. The interfaces we’ll listen to are all, this last setting might change as we add more fine tuned options and features to the network. We’re going to check and enable that the router listens on ‘All Interfaces’, we’re also going to keep the default SSH port to port 22.

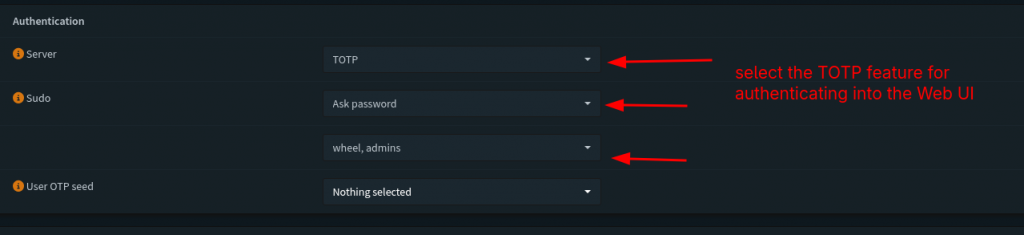
    This section defines the behavior we’ll do for authenticatiing our login information for our users. By default for the authentication server it selects is ‘local database’. But since we selected and built the TOTP server and tested the login info we’ll select TOTP as the server to use. For sudo users we’ll always ask for a password, and we want to make sure the user we’re configuring this for is a part of the admin group.

    Last step for miscellaneous settings

    Last step we’re going to do is head over to the miscellaneous section in the Settings:

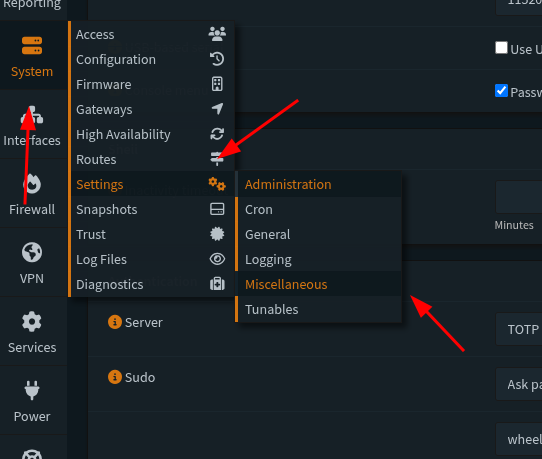
    We’re going to adjust and enable the following:

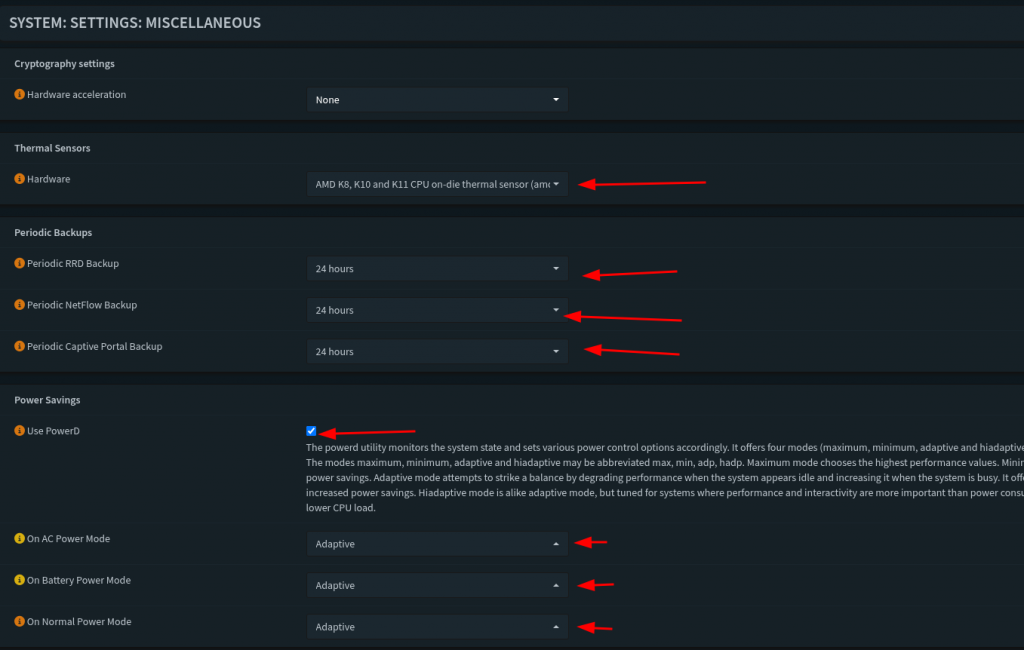
    So for this last section we’re going to skip Hardware accaleration. I want to make sure I can monitor my CPU temperature, this PC is a little older than normal so I’m not too worried about temperature loads exceeding safe levels. I want to enable RDP, Netflow, and Captive Portal backups just for monitoring my traffic. Next I sec all my power options to adaptive, I don’t want it to eat up so much power, but still allow me to have some responsiveness when using the box.

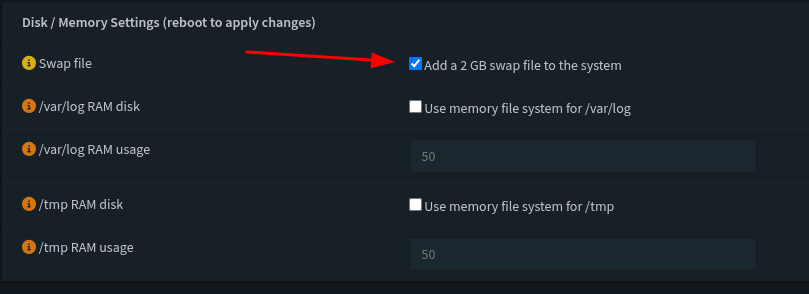
    The last section I changed and saved was to increase the swap file for the disk memory allocation. I have the space for it on this machine so it shouldn’t be a problem. And with that we’re done with the basic configuration of this router. Next I’m going to be going off of The Network Guy’s complete walk-through and we’re going to dive into VLANs and Firewall rules. If I can keep this next section relatively brief I’ll see about getting the WiFi AP up and running. The Network Guy’s walk-through’s are way more detailed than mine but we also set up a really good management network that I want to enable on this home network to make sure that I have the means to have a separate network. And he also did a walk through of making networks separate. So we’re by no means done… anyway my pilgrims, we’ll end this week’s article on this note. Until next time, keep building and exploring.

    References:

    https://homenetworkguy.com/how-to/beginners-guide-to-set-up-home-network-using-opnsense/

  • Home-Lab: Part 2

    Good afternoon my tech pilgrims it’s great to be here again with you again for another article in the series. We’re going to focus on building the OPNSense router and getting it installed. We’re going to recap a little bit since last week and go over the parts that we have available and document how they’re going to be used.

    Recap

    Last week we talked about the process of setting up our gateway in our network map that we set out for ourselves. We were able to get some core crucial components set up for it, this in essence is a wifi extender but it’s critical role that it will serve is as our gateway. I set this up with the relevant information of our home network that we share with the rest of the house. It extends coverage in our area that we live, now this would be fine for everyday use my determination is to make it something that can service external services that I can access anywhere in the world. There are many more plans I have for this network but for now we’re going to focus on configuring the router which lies at the heart of our set up.

    Step 1 – Cabling

    Configure all of the cables to plug into the gateway and the router, remember you want a direct WAN to LAN connection from the gateway device (Wifi Extender) to the router device that you are using. Next you need to somehow get another RJ45 connector to connect to your managed switch from your router. For me I am using something like a TP-Link UE306 USB to Ethernet adapter or a basic Gigabit Ethernet Adapter from Amazon. Both look like something like this below, me personally I went with a TP-Link gigabit ethernet adapter and plugged it into a usb port on the back of my HP Elitedesk small form PC.

    usb to ethernet adapters

    From there I connect a small gigabit ethernet patch cable to the smart switch, hypothetically this should take care of the simple hardware and cable management that we need to arrange.

    Step 2 – Hardware configuration

    Now we need to prep our router to install the image of OPNsense, you can find the download iso here at there website, https://opnsense.org/download/ . A note about choosing which iso file to download, I played a lot between using pfsense and OPNsense. Fundamentally they are running the same system under the hood, and that’s FreeBSD. Although I did try and install pfsense on this particular PC I set aside for this lab I kept getting kernel panic errors when trying to run the demo iso file. I don’t know if this was as a result of driver firmware failing to install, or some other issue happening in the boot process. I did also mod the PC in a slight way, I found in other iterations of this router demo and build process that DHCP resolution was being funneled through my wifi interface. Another take on the pfsense decision is the upcoming hardware modification that I did might’ve cleared up this kernel panic message I was seeing. I decided not to go into Without getting too ahead of myself an interface is something you define in OPNsense as to what you’re going to be using for internet traffic, I could be wrong about this but it helps set up the proper routes you want traffic to go in and out of.

    What I did find when I rebuilt this router several times is that almost always traffic was being routed through my ilfwifi interface. This can be found out when you run an ifconfig command through the terminal on OPNSense it will display the interfaces it detects and you can decide and define what interfaces you want to route from your WAN gateway to the LAN you’re building right now. Now USB to Ethernet adapters are pretty good so far with being detected and used as interfaces for you’re respective routes you want to build and connect.

    So to remedy this I wanted to make sure that the Wifi NIC wasn’t being used at all, so what I decided to do was to identify the Wifi NIC and remove it from the mother board. This is a relatively easy process to do, I recommend if you’re following along with this walk through to make sure that you look up and follow the tech specs that are provided from the PC maker you are using to install OPNsense to. After the Wifi NIC is removed I duct tape the data cable leads individually and make sure that I label them with the proper connections that they came off of from the NIC. This does one of two things, the tape isolates and shorts from taking place with the cable leads, which helps to minimize any hardware errors from taking place. The other is once the cable leads are connected, it’ll help your future self to make sure you know which leads go where should you need to reattach the cable leads to the NIC again. When this is done you can put the PC back together. Now you should note that there are most likely a lot easier ways of doing this but this was something that I wanted to almost guarantee would divert traffic to my USB – Ethernet connection. Also this step is not mandatory data traffic will go through USB – Ethernet connection since the light to the connection was flashing before I did this small hardware modification.

    Step 3 – Image the ISO file to a USB

    Now we are ready to install OPNsense, navigate to the website I linked, and select the vga option to download the file to image to a USB. Using your favorite imaging software a list of some are provided :

    Now we image the file to a usb, and now you are ready to install OPNsense.

    I recommend connecting an external keyboard, mouse and monitor to help with making sure that the installation goes according to how you need it. Boot up your system and enter the BIOS menu, choose your boot menu and select the USB option that matches the one you imaged before. You should start seeing a boot up screen that looks somewhat similar to this one below:

    Before we install the image we are going to go ahead and assign the interfaces to the respective connections. One way to do this (again there are definitely easier options and methods), would be to wait for the

    manual interface assignment: 

    to pop up, this is usually shows up in the boot up process and it’s usually the second pause, it shows up with a 5 sec countdown. This allows you to have the option of selecting any type of key. I borrowed this screen shot from the HomeNetworkGuys channel and his video OPNsense Full Network Build (2025 Edition)

    Step 4 – Assign interfaces

    This is the next steps you would do to assign the interfaces that automatically get detected, however in this case you would need to know what interface is which, in this case for the Home Network Guy’s example his interfaces show up as follows:

    interface assignment option

    In our example we’re going to wait to till the boot up process finishes and then we’re going to login with the password and username root, and opnsense. Once we login we’re going to hit option 8 for shell, and then type in ifconfig (this is installed by default). This will show all of the interfaces that are plugged into the device. We now need to plug in and out each of the ethernet connections, and re-run the command again. By plugging in and out each ethernet connection will show which one is which. When you determine what connection is which keep track of which one is for the WAN and the other for the LAN. In this case for my device my interfaces are bge0 for the LAN and the interface ue0 for the WAN.

    install boot screen for OPNsense

    This might be a clunkier version of finding out the interfaces, and believe me there are definitely easier ways. But unless you found which interface is which you’ll know for sure what interface will follow our network topology and plan. To exit the shell prompt we can type exit and we’ll be taken back to the main menu, once there we can select option 1 to Assign Interfaces

    11 interface assignment for opnsense

    We’ll be prompted with an option if we want to configure VLANs and LAGGs for now we’re going to say no to both of them.

    The system will show us which interfaces it detects, now that we know which one is which under the prompt to select the WAN we’ll enter ue0 for our choice. The system will then ask you to configure the LAN, it’s very easy to skip this part (at least it was for me) so when we get to this step enter bge0 for our LAN and after that part we’ll be done. We’ll be asked if we want to configure an optional interface, but we can hit enter and it’ll ask us if we want to confirm our answer. We’re going to hit y for yes, and it’ll confirm our selection.

    The login screen will pop up again and our LAN and WAN interfaces will be set and configured, we’ll see a default LAN IP address of 192.168.1.1 and for now we’ll leave that set to default. Remember at this point we haven’t installed the system yet we’re still in the live environment. We’re going to do one last check, on the main menu we need to select option 7. We’re going to perform two tests to make sure DNS and DHCP are connected properly. We can select either one, this is the equivalent of doing a ping test in a terminal. Same idea and concept, so for my purposes I’m going to ping the IP address of the Google name server at 8.8.8.8 . If you come back with no error messages and that the ping tests were successful we know that DHCP is working. The last thing we can do is the same type of test again but to test that DNS is working, type in google.com as the result to test. And same thing if no errors occur and all packets have been delivered then we’re good to continue with the install.

    Step 5 – Install Process

    Now we’re ready to install the system, in the option selection type installer and we’ll be prompted to this scene below:

    keyboard setup

    Select you’re appropriate keyboard layout, then select the appropriate file system to install. OPNsense documentation recommends to select ZFS as the file system, it has better reliability and performance. So we’re going to select that option:

    We’re prompted to select a RAID hard drive configuration, for our purposes I don’t have several drives installed and am only using a single one. So we’re going to select Stripe for our setup:

    It’ll pull up the available hard drives (or disk pools that it detects), so confirm the one we’re going to be using. One good side point that I gotta say BSD has going in it’s favor is that it distinguishes between drives installed and doesn’t include the USB drive we’re using.

    It’ll confirm the drive name you want to name, I typically just let it auto name it as zroot and confirm the selection.

    Lastly it’ll ask you to confirm final changes, we confirm yes and let the installation proceed.

    Once installation finishes installing we’re going to select the option to change the root password or restart the system this will confirm the installation to take place but if we select the restart option we need to make sure to remove the USB installer media when it prompts us to. In my case I want to take advantage of the choice given to change the root password, and so follow the prompts to do that. Going to keep this part brief since this write up is already getting pretty long. The system should then reboot and we’re ready to use OPNsense.

    Conclusion and closing thoughts:

    So now we’ve finished installing OPNSense on our router, if all steps are followed in these write ups so far, our router should be directing input and output traffic through our extender. We can run an ifconfig on whatever computer we have connected to our switch. And if the IP range for the ethernet connection looks like this then we’re good to go.

    There likely is way more I skipped but that is the general instruction for getting OPNsense installed. We can no configure our IP addresses for each interface, and configure other settings. But we’re going to work on that next weekend, the only real challenge with this install is marking and knowing which connection we’re using for the WAN and LAN interface. But I can confirm at least that there’s traffic coming and going and we will leave this weekends walkthrough there for now. Have fun this weekend building and experimenting, until next time my tech pilgrims.

  • Home-Lab: Part 1

    Good evening my fellow tech pilgrims, it’s good to be here with everyone and I wanted to start by apologizing for missing last week’s session. Here in Seattle we had the Superbowl and a good portion of the town and city wasn’t going to miss this opportunity. So definitely need to apologize for missing my deadline. This also was a bigger project than I realized and I have to admit I have had to trim it down a lot in order to stay focused on the main objectives that I want to achieve. This post is heavily inspired by Patima Poochai’s article I cited last week.

    Objectives

    So I mentioned about the objectives here, and this is the direction I’ve been wanting to go for my home lab. Where we live, we have a shared router/gateway from our ISP provider that services the whole house. Thankfully it doesn’t have any strength deficiencies so, everyone is able to get the internet they need. But of course me being me I wanted to take this a step further and build a home lab. One of the most rewarding things you can do if you have extra PC parts lying around is to give them new purpose and let them live on in other ways as network devices.

    Where it stands this is probably my 5th or 6th iteration of this phase of the project so the more I repeat certain parts the better I get at remembering them. The purpose of this project is to build a fully functioning home-lab and to use it for testing out new tools and hosting services on it. But that’s just the general high preview of everything.

    The purpose of this article is to work on getting the first critical parts completed and running. That includes the following hardware:

    • I am my router on an HP Elitedesk 705 G2 with an AMD A10 processor mini pc and 16 gb RAM, I threw in a 250 gb SSD which should be more than enough hard drive space.
    HP G2 Mini Elite Pro Desk used for my router
    • Using a NETGEAR 8-PORT GS308E managed switch
      – Same with a NETGEAR GS305 unman-aged switch for my different devices that I use, for day to day work or back up PC’s I have in case one is offline.
    managed switch Netgear
    • My WAN is a TP-Link AC1200 (TL-WA2201) Dual Band wireless access point, it is set to Wifi Extender mode

    Road-map for the future

    Since these are the first components that I’m building, my eventual plan is to have the following setup for my network. This network will be used by my partner and I for our day to day use, lab experimenting, and a cyber security research lab. Basing my study off of an article and write up of the Network Guy I’m going to split these networks up into separate VLANs so I can keep traffic separated from layers that either don’t need to be exposed to the internet or exposed in a configured and hardened way. This is something that I had in mind:

    VLANs
    – Guest Wifi
    – DMZ designed for public facing services
    – Management (managing network and network communication)
    – IoT – put this up later mostly need wifi dmz (public wifi) and managing internal network.

    Now that we’ve got that out of the way lets focus on the parts we need to configure.

    Extender

    So we’re looking to aim for a network diagram like this below

    We need to configure the extender, the first step involves getting it powered on with the supplied power source. We need to run a patch cable and connect one end to a computer that we want to work with and the other end to the extender. Next we need to make sure that in our network settings we are connected to the extender it will have a hostname (also known as the SSID) usually in this type of format, since we’re plugged in through Ethernet that connection 9/10 times is automatically managed for us.

    This above photo helps provide the example that we are looking for, we want to connect to the IP address that it is either attached to or we can try typing the URL that is also highlighted. This should take us to the admin portal that we want, from there we need to setup our extender so that way it is connected to our existing Wifi network for the main home.

    I should suggest that at this point, much of the rest of the configuration will depend largely on your own personal needs and preferences. For my device in particular it has an automatic setup feature which allows you to enter the needed information for your existing network.

    Once that’s setup, Patima’s article suggests to test your internet connection and to make sure that it is connected both ways to the internet. One feature that my device has is that it shows you a status graphic of whether things are working and functioning properly. Another good tip I recommend is to pull up a terminal and run ifconfig and it should show you what your network devices and the ip address is. Lastly, check that the network traffic is going from source to destination, run a terminal command ping 1.1.1.1 and then also run ping google.com this helps to confirm whether DHCP and DNS is working.

    From that point we are ready to configure our network settings, I should say that it’s at this point where things kind of threw me off with configuring of the router so it’s very important that we make sure this part is configured properly. We can to set the LAN settings to the following:
    – IP address: this is the device address, in a way it’s acting like our gateway.
    – Subnet mask: this divides our larger network into smaller more efficient sub-networks
    – Default gateway: is the address we put for our router gateway we are tapping into

    Settings:

    DHCP server allows us to hand out IP addresses to all of our clients/devices that are connected. To be honest I’m still investingating this feature some more, I have DHCP enabled on my WAN side of my router, and it’s working fine but need to see if I turn this off if it’ll have any effect on the router and internet traffic. For now I have it set to on, the IP range you have to decide what you want it to be and how big you want your network to be.

    What I suspect as well you define the DHCP settings very similarly to how you do it on your router (we’ll cover that in our next article). So it’s very similar to how things are in both devices. I leave the Lease Time for each address for 1 minute, the DNS servers I configure them to be 1.1.1.1 (through Cloudflare) and 8.8.8.8 (through Google). When all settings are configured to how you like them you are mostly done with the WAN part of the setup. Save and confirm all of your settings.

    From there we go to the wireless menu, I only have this configured to connect to the existing Wifi network but not to extend it or broadcast it. The Extender is probably one of the most critical pieces of my lab so I don’t want others to get access to the gateway device and risk compromising it in anyway. I make sure the connected settings are correct with the existing network, extend network I leaf deactivated. MAC filtering I leave deactivated also because I don’t need to do that kind of filtering when I have the same feature in my router.

    System Tools:

    This is the last setting I configure, first thing I do is make sure that I have the correct time settings configured for this device. It’s needed many times for if I want to run some different admin jobs. I leave SNMP, Ping Watchdog, Diagnostics, and System Logs all unchecked. The only other settings that I’ve configured are my Firmware Upgrade, Reboot Schedule, and Backup and Restore. Backing up the system I usually save for last, because everything is at a point where I want it and it’s smart to back up and save your work. The other feature I place as really important is upgrading firmware, upgrading the device firmware is a good security health check to do to make sure you don’t risk running compromised and out of date devices. I refer you to TP-Link’s website to find out what new firmware they have available for download. This device through the admin portal has a handy upload feature you can use to upload the .bin file and run the update process. I highly recommend* when you do this you give the device the time it needs to finish the update. Lastly, I recommend you save the current version of your configuration before changing your password. That way if there’s an error that happens with the password you’ll have a backup you can pull from and update in place when you reset your device. Once that’s done, change your password using best practices for password creation to make it unique and personal to you. After that we should have everything configured with how we need it to be for the WAN and connected to our existing household network.

    Closing thoughts

    Well my pilgrims it’s been a good step so far to get this first part complete, the part I had trouble making sure that was configured correctly was the DHCP part of the WAN. There’s a similar setting that comes up when you’re setting up OPNSense. So I might leave this setting I did as is or change it down the line. At the moment everything is working, and the DHCP part that I have configured for the router is working and pulling a different numbered network range. Think of the ISP network being like a 198.1.1.xxx range, while mine is a 10.0.0.xxx range so that tells me that at least the WAN side of things in the router is working and pulling from my subnet I have set up for my home-lab network. I think in someway though the DHCP is still pulling from the ISP provider, because when I run an Ookla Net Speed Test it’s showing up as the provider server being from our ISP. But I’ll take the win for now. Thank you for sticking around through this setup next week we’ll start working on setting up OPNSense. We’ll do next weeks article on the configuration of the router, and then do some customizing of the router to get it to a status we want. Time to go journey some more in our wilderness, until next time, catch you at the next oasis.

  • Skipping this week

    Good afternoon my tech pilgrims, I’m going to skip this weeks article due to a lot of things I’m working on currently the network lab set up and it’s no where near ready. But I’ll follow up again in a couple of days on how the lab set up is going.

  • Next Steps

    branding avatar with the opnsense lapel button fixed to his sweatshirt.

    Inspiration:

    https://dev.to/patimapoochai/how-to-run-a-home-lab-without-an-ethernet-port-220j

    https://homenetworkguy.com/how-to/beginners-guide-to-set-up-home-network-using-opnsense

    Good evening tech pilgrims, in our journey along the road of self discovery we sometimes enter into periods of reflection and growth that can help us in our future steps that we take. One such journey that I have been wanting to take with this path that I have been on in IT has been to build a home lab.

    One of my over arching goals is to self-teach myself the skills I need to become a cybersecurity researcher. This is a more over arching goal that isn’t specific in it’s goals definite like studying for the CCNA. Yes, to me it’s more liberating to walk the self-made path and to pass fellow journeymen who are looking for there own Shangri-La or Nirvana that guides them in this wilderness that we all travel.

    Without going to far off tangent the expansive world that we live in is changing so much with new advancements being made in AI. The other frontier that I am keeping an eye on is quantum computing and what effect that will have on how we interact with these interfaces in our life. But what is the point of the home-lab idea that I am building? Well it’s to confront two big points, the first being that I need a place that is somewhat isolated and safe from the world to build and practice on. The other is to host actual services that are pointing to the web (in a safe way) that I can access from anywhere. My over arching plan is to also have tunneling services running with the main services to have a management tool to configure them without the need to worry about local Public wifi or secure networks that I am behind.

    I think the high for me at the end of the day is also the success that comes from taking projects that other people have built and getting them to talk to one another as well as the world. That kind of joy still gets my blood boiling and my heart racing. So come with me on this journey as we start building my digital castle…I have to ask in my robot voice, “are you ready Player One?” Let’s get building!

  • Ready for action

    Good morning my techies and pilgrims on this journey, I am writing this in the late morning today on Sunday. This morning I was struggling to think of what features I wanted to discuss and cover in the blog this week. It’s been several bouts and iterations of the Batman memorial page. And I think I can say confidently that the assignment and the project are complete. Let’s dive into some of the changes that took place.

    Batman, Forever!

    Changing HTML

    So the first item to address are some changes that I had Copilot help me with some changes that were important for the format and layout of the page itself. The biggest thing that I wanted to do was to make sure that I can have the page be accessible on other browser formats besides computers. I should start off also by prefacing that the LLM made several grammar and punctuation corrections in the index file. This was the checklist that I wanted to achieve:

    • Have LLM help me with spelling
    • Optimize the HTML index file for other browsers.

    It altered the time format in the time <small> element the other big improvement that it made was for it to add additional controls to the looping animation.


    The last change that it made was to adjust the comment that I had, I had experimented a little bit with tweaking the speed of the video animation. Granted it’s not a long video animation but I wanted it to play at a good enough speed to have it be fluid but also ‘heroic’ in a sense. That’s probably something I mentioned in my last post. But this is what the difference was in the commits I pushed to Github.

    That’s pretty much all of the changes that I wanted to make to this, now onto the style-sheet…

    Changing CSS

    Perhaps the first change I had to do was to make sure that the text was showing up correctly. When first launching the text in Github pages it wasn’t using the custom font that I had committed to the repository project folder. I was able to learn, at least for Github pages that it is somewhat case-sensitive with how relative file paths are declared. And since I’m copying and pasting from my private repository to a public one that I use I was getting the file paths mixed up. The other thing was to make sure that it had a “.” prefix stating to recursively look in the current file directory.

    Onto the next one, in the body class the line-height property was added and set in the body class:

    One of the things that I prompted Copilot to do was to optimize the website for mobile devices and using that prompt it was able to add the following property to the .animation class. This helped to give a radius border of about 10 pixels and make sure that was a slight shadow that surrounded the animation.

    Next class that is decided to work on was the .headshot class and in there it made the following optimization for small phones. And it turned out that this wasn’t a class at all that it was working on it is a media query. I guess they make changes based on specific device conditions, especially with other devices being involved.

    This media query was also used to give some padding to the body class and make it applicable to tablets and desktop browsers.

    Wrapping up

    Other than that my pilgrims, that’s all I have to wrap up with for the batman project but I’m super glad it’s ready and live. The other thing I forgot to mention that the LLM added a universal selector to have all elements calculate there dimensions according to the same styling rule guidelines of border-box.

    Other than that things should be good to wrap up for this week at least. I’m going to be taking a moment to plan what I’ll discuss next week and get some good topics going. My next aim is to get some tools up and running to keep pushing my code to these tools and repositories that are self hosted. But I also want to make more content that is centered around system admin workflows and bridging topics that will help others learn about system administration and network engineering topics either for work or home-lab purposes. Have a safe weekend ahead.

  • Pushing towards the finish line

    Project source:

    https://learner-studios.github.io/batman/

    Good evening my tech pilgrims, I wanted to apologize for the hit and miss schedule that I have been holding myself to. The process of building the life I want and the journey to get there from here has been rocky not only with personal life stuff but also battling the results of procrastination. I wanted to sincerely apologize but also say that I have no excuses I want to give and instead want to simply jump in and explain to you what has been going on.

    So to start off with I have come from a completely different direction than I had originally pictured. I might’ve already mentioned this and I apologize if this is is repetitive in the slightest. But I have had this idea for a few years, the original seed of the idea came to me in November 2022 when I had found out that Kevin Conroy had passed away.

    At the time I had mostly finished university undergrad studies and getting my footing after graduating and the COVID pandemic really threw me for a loop. But I had wanted to compose this memorial page for him to show respect but also the love that he had had for a lot of people in my generation and all of the dedication he had put into this character.

    Concept design

    Originally for the idea of this page I had wanted to make sure that this web page had an opening scene where Batman originally got the Bat signal and was donning his gear and costume to head out to where the action is. But this opening scene I had envisioned it to include Kevin Conroy in place of the animated version. This scene I still wanted it to be open and animated but with the actual voice actor being substituted for his normal analog. This animated scene would be presented as a full screen scene that would transition to the web page loading and showing the tribute page.

    This ultimately was an idea I scrapped, one because the shelf life of this idea was starting to show it’s age and I am really pushing myself to make sure that I publish and get my projects live and not really worry too much about perfection. It’s kind of the same analogy with writing if you never publish and write your work will never get out there. This medium is what I prefer to use for my communication. And here’s where we will continue our dialogue…

    With the animated scene out of the way I wanted to focus next on the copy and structure of how I wanted this page to be. Originally I had wanted this page to be something that I threw together to highlight the extensive life he lived but again keeping with the principle of ‘less is more’ I decided to keep it a brief outline and overview of his life and embellish it some more with other visual flare.

    Assets

    One of the hard parts of building anything is finding correct sources of assets that others have built to throw it together in a product that you like. The first thing I wanted to find was a proper font that would compliment the vibe. I did a quick search on Google for one that I decided on called Palazan, it is an open source community built one that really matches the look and feel of the show back in it’s heyday.

    The other type of assets I wanted to grab we some animation scenes that I felt would present the vibe and look that I was aiming for. And the one that worked for me is toward the end of the opening credits scene where Batman is on top of the building with lightning striking the background and his silhouette shining for a brief split second. Really showing his prowess and the results of hard training and dedication to his mission. There were a few other resources that I wanted to track down. One of them was a good head-shot of the actor himself and to include that somewhere in the page.

    For the head-shot I had originally thought that it would be a good idea to have it either on the left side underneath the animation. The original layout I had in mind for the animation and the text format was that the text would be centered on the right side with the media (animation and pictures on the left side). But eventually I originally decided to keep things centered. On a separate but same tangible plane I needed to find a good quality icon picture for the favicon in the tab of the HTML page.

    Perhaps the last source of assets that I needed to find was a good source of information for Kevin’s life. I spread my find across a few Wiki pages that dealt with the animated Batman character, but it also spent a good amount of time giving the highlights and overview of Kevin’s life. There was also a memorial page that a writer wrote who works for DC and I do say they did a good job of running through how Kevin got the role of playing Batman. With these pieces in place I was ready to start creating.

    HTML and CSS Layout

    After I had spent some time looking at the different biography sources I had made sure that I compiled the key points that I wanted to include in the copy of the page itself into bullet points. From those bullet points I wrote the paragraphs and the headings for Kevin’s biography. Most of the web-page was under my design but as with this channel my goal is to embrace a lot of different technologies to explore and learn them. If it would help me with getting better at my job then I’m all for using it and embracing it. But there will definitely be times where I will be challenging myself to do things the hard way.

    Using one of those tools was Claude Code, it helped me with setting up most of the style sheets for the layout of all content of the web page. It also helped with writing the HTML tags that would properly load the animation and the head-shot of Kevin in the positions that I wanted them in. As well as making sure that the animation was running at a speed that I wanted.

    Challenges and closing thoughts

    I wanted to keep this project simple and close it out, there were two challenges, well I’ll say two and a half that I came across with throwing this project together. One of them for me was getting the hosting part of these files figured out. I wanted to write a JSON file to have it automatically create a Github Page and load any changes I make automatically to the website in real time.

    Since this website isn’t something that is content heavy, this was still something that I still need to figure out. The other challenge I have is that this isn’t the final format I want, I still need to go through the written copy and make sure things are edited and correct to a certain degree. I’m not going to edit it heavily but it has to be in a presentable format, there are also style changes that I need to make to make sure that things like my font and other pieces of design stay consistent across my website.

    One of my proposed solutions, at least for the hosting side of things is to build a self-hosted option with Gitlab. This option sounds the most promising because it provides a lot more tools available to monitor whatever an app and project you load isn’t down or suffering from other types of vulnerabilities.

    Lastly, the ‘half of a problem’ that I was struggling with was to use Claude code and AI solutions in a progressive way where I’m not relying on it 100%. This is the balance that I’m trying to make sure I keep with. However the project I’d say turned out to be a really good success. The next item for me I’m investigating could be building a progressive web app. I have this idea for a rotating grocery list that is shared between my significant other and me and that would essentially be out grocery list in case we ever need to make some last minute adjustments that we can share across devices. This would save us time from writing lists and then sending it to each other. Just write and process in real time. Anyway that’s all I have to mention for now, thank you for coming with me on this journey. Onto the next project…enjoy yourself on your journey, stay curious, and stay building.

  • Missed the ledge

    Hey techies, thank you for bearing with me and your patience as I worked through some things, I was able to get the repository on Github figured out and the Github pages working so it’s hosting the simple site. This is by no means finished but it’s live at least, thank you for bearing with me as I worked through this crazy weekend. Going to keep working and getting things built the way they should be.

    https://learner-studios.github.io/batman

  • Batman Forever process ongoing

    Good evening my techies, this is another short post for today there’s a lot of family holiday’s going on right now. But I wanted to at least work on some things that have been going on, working off of being sick I had to take a moment and have a break.

    I have been working and focusing more on my studying that is higher priority. But now that I am slowly getting up to my rhythm it feels to be building and doing research again on the web page. I got some more of the memorial page and written. Granted this isn’t a final draft but it is nice to be building again. I am considering working on another web type of page for my girlfriend and I to have access to an ever evolving grocery list. I will plan on having some more info added for next weekend. But for now hopefully this will at least be a good start for this weekend and the week ahead.

  • Project 1 – Batman Forever Page

    Good evening my tech pilgrims, I am under the weather today. So unfortunately this article is going to have to be a little bit short. I have been working on getting a commemoration page up and written for one of my favorite voice actors who passed away nearly four years ago. This is a page that I have been wanting to do for a long time and I’ve for one reason or another been lazily putting off but I got off to a good start on it this week.

    Been working a lot on my studies and getting a new account set up that is separate from my work email and accounts. So much of my time this week has been getting that account set up and set up so I can make sure that I can keep my progress going with Free Code Camp and not be hindered by anything or an other decisions that I made early on that locked me out of that account. My plan was to do a stream today but that’s going to be pushed out to tomorrow. We’ll be finishing up the Batman page. So without further chit chat this is what I have so far on my current progress:

    https://github.com/Eulersghost/fcc-fullstack/tree/main/Batman